Showing posts with label Studio Portrait. Show all posts

Friday, 10 January 2014

Evaluation

For the assignment I was looking forward to starting; I liked being in the studio and was eager to be able to expand on my range of knowledge with new equipment. Going into the studio with the group for the first time was a little awkward as there was so many of us and we didn’t really get a chance to do much, we watch the demonstrations and tried to take most of it in. But when we got split up into smaller groups it was easier to get to grips with the equipment as I got to play around with it a bit more.
          
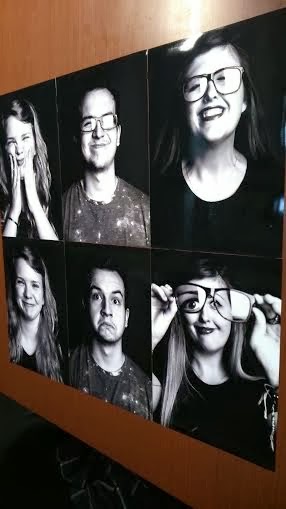
I also went to a talk on Steven Pyke and I really liked his way of photographing and his end results. From watching this I new I wanted my prints to be in black and whit because I think it bought out the emotion in the image more but that is just my opinion. So I started to research portrait photographers that mainly worked in black and white, then the name Lee Jefries came up and I was drawn to his work with all his models pulling faces at the camera. I decided I wanted to do something similar with my images but trying to capture a reaction rather then a funny face.
          
I went back to the studio with this in mind but rather than a few of us being in there to set up there was only me and one other. This was a good thing as it made us concentrate, as there wasn’t anyone else around to rely on. We got the studio set up with just one frontal light and two of the black polystyrene boards either side of where the model was going to be sitting. This was because I wanted a black background and a heavy contrast. It was then linked up to capture one, which was also new for me but I really enjoyed using the software as I had seen it being used on programs like Britain and Irelands next top models. I felt quite professional using it. My models then arrived once it had all been set up. This worked well at thy didn’t have much waiting around and all I needed to double check on was if the eyes were in focus using capture one with the icon that highlighted everything green once it was in focus.
          
Once I was happy with the photos I choose six that I wanted to work on further. I uploaded them onto Photoshop and changed the levels of the shadows and highlights to add a heavier contrast that I wanted from the start. When I was happy with them the last thing to do was to send them to get printed. I had to think of what type of paper I wanted them on. So I had a look at all sorts like metallic and pearl that I had never seen before but I did really liked. It wasn’t really what I needed for my black and white portraits though. I realised that I needed to keep in simple and went for a plain gloss. My initial thought was to use ‘Digitalab’ as I had used them before and was happy with the results. I also think it’s important if you can to keep the trade local.

Now that the assignment is almost over I feel that I have now got a much better understanding of what portraits are, and I am much more confident with the studio equipment, such as setting up the lights and using the Hasselblads with the digital backs.     


Thursday, 9 January 2014

Prints Arriving


I got my final prints done at Digitalab in Newcastle, all i wanted was just simple gloss paper with no. I thought with all the black the image would really benefit a gloss finish. If I was wanting a metallic or pearl paper I would have sent them to London or Brighton lab but as I just wanted gloss it seemed right to keep the trade in the are and stay local and use Digitalab. I also chose not to have boarders as I felt that the images needed to be seen as big as possible. 

Final 6 Prints


Final Studio Session


For my final shoot I had a very clear idea of what I wanted to do. I new from the start I wanted heavy black and white contrast. In terms of what I wanted my models to do was to be completely free with their facial expressions, just like I had been with my ink and water portraits. I wanted them to feel relaxed enough that they could be silly and let their faces do as they pleased. If there was something they had done with their face that I liked but had missed taking the image the first time I would ask them to go back to what they were talking about to see if I could get the expression back or I would do something similar with my face and they would accidentally copy it without realising.  


 The only thing I did on Photo Shop was enhancing the levels to make some of the shadows darker and highlights lighter for more of a contrast. Also I found a clarity tool, which I had not seen before and used it a little on all of the images. I didn’t use light room because the system was down and only started working again after I had sent for my prints to be printed. I’m not to worried about this as a can always practice with light room now its up and working and at the same time I am happy with how my images have turned out.

Monday, 6 January 2014

Tonal Mark Making

These are just a few of my attempts at being free with an ink pen and water to try and create some expressive marking that build up a portrait.


 I started with a basic scribble marks, than started to build up heavier bolder tones around the eyes, nose and shaded areas. one I was happy with the basic outlines I then added water to fill in the wanted gaps. As you can see on the second image it add different colours depending how much water is sat on the thickness of ink. I enjoy having ago at this technique because it always a bit of a surprise as what it might look like once the water touches the ink.


Historic Paintings And Images


I find it nice to look back at how portraits use to be and what I have achieved in the past couple of weeks. I have been looking in a book called ‘The Beginnings of Photography’ a lot of the studio images were taken in the 1860s with a stone wash backdrop. Not a lot of the portraits looked incredible happy. I can imagine its because they would have had a reputation and cretin image to uphold. But now it’s more than okay to be free with your expressions and to show you have a sense of humour without having people criticising the way you are. 


'The Beginnings of Photography                                       
Plate 16                                                                              'Plate 17 
J.M Cameron                                                                     J.M Cameron  
Sir J.F.W. Herschel, 1867 (395)'                                       Charles Darwin, c. 1869 (378)' 


Just some portrait paintings from throughout the ages which have influenced the way portraits are seen today.

https://www.google.co.uk/search?q=portrait+paintings&espv=210&es_sm=91&source=lnms&tbm=isch&sa=X&ei=LhHLUsKqA4Kd7gb-24CoAw&ved=0CAkQ_AUoAQ&biw=1024&bih=513#es_sm=91&espv=210&q=portraits+by+picasso&tbm=isch&imgdii=_


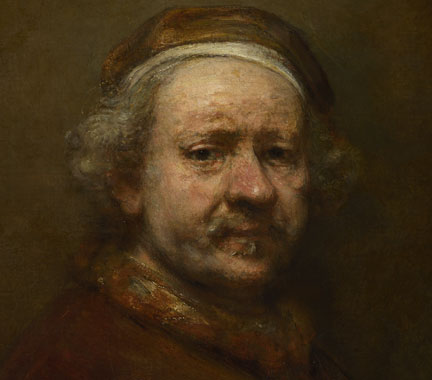
This is a more modern way of portrait painting by using a tonal mark making technique with a paintbrush. I really like the messy markings and how it makes an image come together. I think I will have a go at doing a really free moving images with scribble marks such as this one.

http://www.nationalgallery.org.uk/upload/img/Rembrandt-self-portrait-age-63-NG221-c-face-half.jpg


Wednesday, 11 December 2013

Lee Jeffries


I really like all of these portraits by Lee Jeffries. They are all a bit odd which makes them hard to not look at and I like the thought of faces appearing from the darkness. 

Monday, 9 December 2013

Studio Shoot

Getting to work in the studio with less people around was really, by being made to just get on with setting the lights and camera up with just a couple of others helped me made me understand the set up so much more by physically doing it myself. Also with a smaller group of people I could get on with what I wanted to do and experiment a lot more without feeling like I was taking up all the studio time. And the models seemed more relaxed and natural in front of the camera without the pressure of people watching them.

Today in the studio I managed to mess around a bit and try photographing with a black background but without a black backdrop. It took a bit of experimenting with the lights to get it right but I got there in the end. Once the background and the lighting was correct I then had the task of getting my photos to have the took that I wanted, this was influenced by Steve Pyke's work with his Moon Bug project. I wanted to have them black and white with a heavy contrast but I wasn't to sure how to do black and white with capture one as I was still getting use to the software. So I thought that I would do this later when I use Lightroom. I increased the contrast a little but I thought that I would also do more of this on Lightroom so I can see how it looks with the black and white.      

Wednesday, 4 December 2013

Richard Avedon

Richard Avadon was well know in the photography business for fashion and portraits. His fashion shoots seemed to have a lot of movement, this showed the fashion garments off on a new light as you could see how the material moved. It also created elegant photography like the garments themselves were dancing.

His portraits on the other hand seemed more striped back and simple. He often didn't use props but if he did it was just the one to help portray the subject. For example his use of props in these two photos portray the image of country kids witch may illude the look of a deprived childhood to the upperclass.


I don't think you could get this without the props. They would still have the dirty clothes and messy hair but the snake and the gun let you know a bit more into these children's lives. The young man on the left might have just been given his first gun from the way he is holding it. This might mean he is seen as a man in his dads eyes and feels hes son is old enough to go shooting with him.


The other side to Avadons portraits is capturing inner beauty of people. Like the image of Kate moss, she is completely stripped back from make up and hair appliances and it's just kate infront of the camera with no added extras. I also like that she isn't symmetrical and her face isn't technically pretty but I don't think that's what beauty is. I think beauty is about being unique and having imperfections is good and is what makes you stand out.


All photos are from google images
https://www.google.co.uk/search?q=richard+avedon+portraits&source=lnms&tbm=isch&sa=X&ei=qQufUqHgNei30QWd8oCoBQ&ved=0CAkQ_AUoAQ&biw=1600&bih=987

Wednesday, 27 November 2013

Moon Bug

The other day we watched a documentary about Steve Pyke, who wanted to take photos of the first handful of men that got to walk on the moon. I found it really interesting how he had gone to so much effort to take pictures of these old aged astronauts who seemed that they had past there time. But as he is going around America and photographing these men, it's quite sad because they seem a bit like yesterdays news as they have grown old and are now living normal pensioner lives. But they are a huge part of historic events as they were the first set of people willing to risked there lives knowing what had happened in the disastrous flight of Apollo 1, and that must have been a really scary thing to do. 

I really like the way the pictures look, with the faces emerging from the darkness and how the features of the mens faces are really defined with the type of lighting and camera settings. For my portrait project I would like to try out this lighting technique that Pyke has used because it looks really dramatic, and we are getting professional prints developed and i think all the black ink engulfing the faces will hopefully look really good. Another touch that Pyke added was he took a photo of the men's feet, I thought this was really nice as it was an obvious connection to them walking on the moon.
  
Also when he was photographing the men he made them really relaxed by going to there homes where they were comfy or if they wanted to go outside like one man did, who was seen as a bit of a free spirit he did so. With him doing this they were able to have a chat about there experiences and him stories, which bought out there personalities. And Pyke was constantly aware of what there faces were doing. So if they were about to laugh he had already pressed the shutter. Because of this I personally think he managed to capture the personalities of the young astronauts that they use to be.


Also with all of these images you can't tell if they were taken outside or in someones house. He has managed to make them all look like he has taken them in the studio.


https://www.google.co.uk/search?q=steve+pyke+photographer&espv=210&es_sm=91&source=lnms&tbm=isch&sa=X&ei=ySOWUq69E4mUhQfEqICIAg&sqi=2&ved=0CAcQ_AUoAQ&biw=1001&bih=513#es_sm=91&espv=210&q=steve+pyke+photographer+moon+bug&tbm=isch&imgdii=_ 

This link was used for both photos.                                                                                                                                                               

Tuesday, 19 November 2013

Hasselblad Cameras


Today I was in the studio learning a bit more about A Hasselblad camera. I had briefly had a look a one before, but never really got to take it apart and learn about the lens, body and back until today. I liked learning about how each component of the camera worked and how it linked to the next part of the sequence to make images. 

I am really looking forward to getting started with this next project and am going to try and get a lot of research done as soon as possible so I can book studio time and make sure I am happy with my pictures so when I get my pictures back through the post I am really happy with the final prints, as I wasn't majorly happy with my final images for the street photography assignment. I think it was because I rushed using up the films so i could quickly develop them and start finding the ones I liked if I had taken more time on what images I had been taking I would have been much happier with the outcome.

top photo is from google and the other two are mine.
http://blog.larrymcneil.com/wp-content/uploads/2013/05/Hassy_Camera_Logo3.jpg